Definition of Missing Inventory
Missing Inventory can be categorized into two main types:
- Inventory Found in the Field but Not on the Map: This refers to existing items that are discovered during a survey but are not listed in the current inventory records.
- New Inventory to Be Built: This involves the identification of locations where new inventory needs to be added, such as the construction of a new pole at a specific point.
Adding a Missing Inventory - Pole
1. Start Adding Hazards or Missing Inventory
Select a section on the map, then press the "Add hazard" button to add hazards or the "Missing inventory" button to add new poles and chambers.

2. Choose the Type of Missing Inventory
A selection window will appear. Choose between "Build inventory missing from map" to record missing inventory on the map or "New inventory" to record new inventory to be built at the location.

3. Select the Type of Inventory
Choose the type of inventory you wish to add. Select "Pole" or "Chamber".

4. Confirm the Selection of Inventory Type
Ensure "Pole" is selected as the inventory type and press "Save & Continue".

5. Add the Location of the Missing Inventory
To record the location of the missing inventory, move the map and align the missing inventory location with the cursor.

6. Confirm the Address
Enter or confirm the address where the missing inventory is located.


7. Enter General Details of the Pole
Enter the general details of the pole, such as:
-
- Pole ID: Identification number of the pole.
- Pole type: Type of pole.
- Existing drop wires: Number of existing drop wires.
- Pole position: Position of the pole (Footway, Carriageway, etc.).
- Pole location: Location of the pole (Public or private land).
- Feed type: Type of feed (Overhead or underground).
- Additional notes: Any additional comments.
- DP details: If present, add the details of the distribution point (DP) as needed.


8. Enter Distribution Point (DP) Details
If a distribution point (DP) is present, enter the number of homes served by the DP and any other relevant information. Press "Save DP Details".

9. Enter Additional Details
Add additional details, such as:
-
- Last test: Details of the last test conducted.
- Pole to pole span: Number of spans between poles.
- LOS: If there is any loss of line of sight between poles.
- Chamber: If a chamber is present.
- Joint user pole: If it is a joint user pole.
- Capping & elephant's foot: If capping is required at the base of the pole.
- Ladder access: If there is ladder access.
- Low drop wires: If there are low drop wires.
- A1024: If it is present.

10. Select Pole Status and Potential Issues
Select the pole status and identify any potential issues, such as:
-
- Insufficient space at the top of the pole.
- Tree trimming required.
- Absence of a ring-head.
- If the pole is non-radial.
- Add additional notes if necessary.


11. Check for Hazards
Check if there are any hazards associated with the pole and add comments and photos as required. Press "Save & Continue".
12. Calculate the Pole Angle
Calculate the angle of the pole by aligning it with the vertical line and saving the details. The angle will be automatically calculated. Press "Pole Angle" to start the measurement.
Adjust the view of the pole to calculate the angle. After saving, press "Save & Exit".

Verify that the angle has been saved correctly and press "Save & Continue".
13. Add Photos of the Pole
Add photos of the pole number and details by pressing "Add Photo". After adding the photos, press "Save & Continue".

Add photos of the top of the pole, ensuring all sides are captured. Press "Add Photo" and then "Save & Continue".
Add a full picture of the pole from a distance that allows it to be seen entirely. Press "Add Photo" and then "Finish".
14. Review Pole Details
Review all the details of the pole entered in the sections:
- Pole general details
- DP details
- Additional details
- Potential issues
- Angle of pole
- Photos: pole number & details
- Photos: top of pole
- Photos: full picture of pole
Press "Save Pole Details" to save all the information.

15. Complete the Job
After saving all the details of the pole, press "Complete Job" to finalise the work. Ensure that all sections of the map are filled in as necessary and that all poles and chambers have been added correctly.

By following these steps, you will have successfully added a missing pole inventory to the system.
Adding a New Inventory - Pole
Now you'll see how add a new pole inventory item using the Build Module, following the steps illustrated in the provided screenshots.
Step 1: Select the Section
- Open the survey application and navigate to the job map.

- Tap on the section of the map where the new pole needs to be added.
- Press the “New inventory” button to start adding new inventory.

Step 2: Select Inventory Type
- In the "New Inventory" screen, choose "Pole" from the inventory type options.
- Tap "Save & Continue" to proceed.


Step 3: Add Location of the New Inventory
- A prompt will appear to add the location of the new inventory. Tap “Continue.”

- Move the map to align the new inventory location with the crosshair cursor.
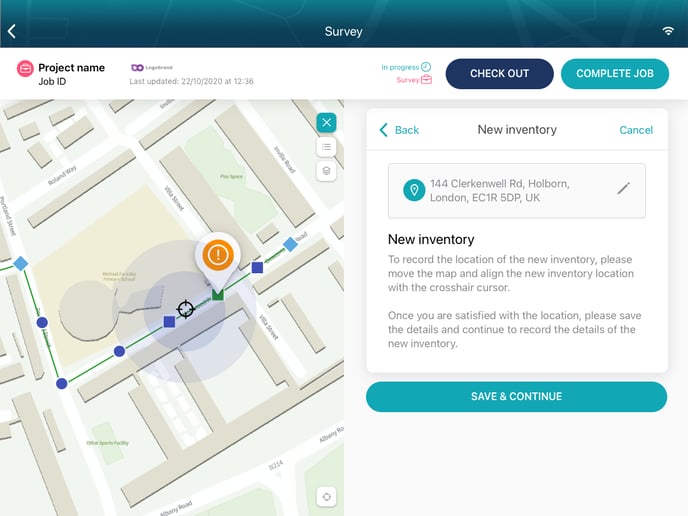
3. Once satisfied with the location, tap "Save & Continue."
Step 4: Confirm Address
- If necessary, confirm or edit the address of the new pole location.
- Select the correct address from the dropdown menu or input it manually.
Step 5: Enter Pole General Details
- Fill in the general details for the pole:
- Pole Type: Select the type of pole from the dropdown menu.
- Pole Position: Choose the position of the pole (e.g., Footway, Carriageway, Verge).
- Footway Width: Enter the width if applicable.
- Additional Notes : Add any relevant comments or details.


Tap "Add Photo" to upload photos of the pole and its surroundings.

Step 6: Save New Pole
After filling in all details and adding photos, review the information to ensure accuracy.Tap "Save New Pole" to save the new pole inventory.
Step 7: Complete the Job
Once the new pole inventory is saved, review the entire job for completeness.
Tap "Complete Job" to finalize and save all inventory records to the central database.
If you need more help, please refer to other articles in our knowledge base or contact support.